</p>

If you’re a Phase One digital back owner (IQ and P+ series) you’ve been told that Phase One Capture One Pro is the main choice for raw processing. Finest quality, and above all they make the hardware, so they’re supposed to code the best software to drive it.
I’m afraid I don’t share the same confidence of Capture One passionate supporters: ever since Adobe distributed the new Adobe Camera Raw 7.0 (shipped with Photoshop CS6, which technology is embedded in Lightroom 4) we finally have an excellent alternative – I would say a far better choice under many key aspects. However, there’s a hidden, annoying pitfall that you must be aware of – friendly called the IIQ paneling “bug”.
What is the part of “not officially supported” that you don’t understand?
![]() That’s what I’ve been told once, and the man was right somehow. To open Phase One .IIQ raw files with Adobe Camera Raw (ACR from now on)is a bad thing to do, theoretically, because they were: “not officially supported”. What does this mean, it’s a fair question to ask, you may wonder, since ACR seems to read and open them flawlessly just like any other CR2, NEF, DNG file.
That’s what I’ve been told once, and the man was right somehow. To open Phase One .IIQ raw files with Adobe Camera Raw (ACR from now on)is a bad thing to do, theoretically, because they were: “not officially supported”. What does this mean, it’s a fair question to ask, you may wonder, since ACR seems to read and open them flawlessly just like any other CR2, NEF, DNG file.
Wrong: it happens that .IIQ files contain sensor calibration data that is not correctly interpreted by ACR, or not interpreted at all. This data, as far as I can see, is used to balance the response of the sensor, which is geometrically divided into 8 sections (2 rows, 4 columns). Whether the sensor is controlled by different pieces of electronics, or it is made with smaller sensors glued together I don’t know and frankly I don’t care.

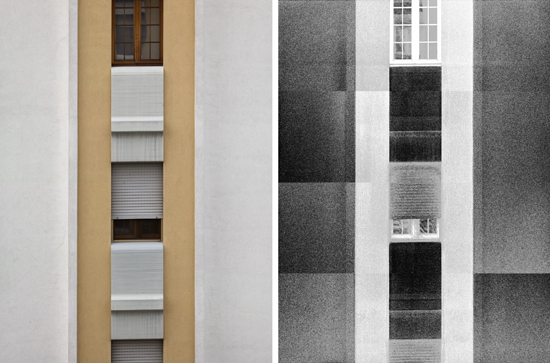
PhaseOne P65+ test shot. Left: RGB version. Right: the “a” channel from Lab equalized shows paneling.

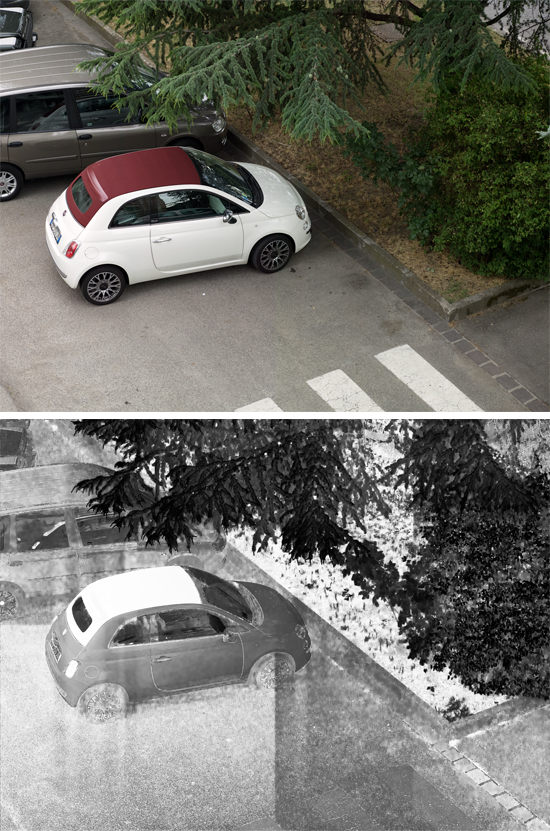
PhaseOne IQ180 test shot. Up: RGB version, weak green/magenta color casts in the asphalt. Bottom: the “a” channel from Lab equalized shows it more clearly
The crucial fact is that if this calibration is lost (and ACR 7.0 and earlier versions lose it), the raw data will be translated into a faulty, demosaicized image. The differences between each zone can be easily boosted by the usual Photoshop color/contrast enhancing routines that are in your repertoire as a retoucher: and believe me, you won’t like to end up with an image which has both magenta and green casts displaced in a chessboard fashion: it’s bad times.
Mind you: this problem doesn’t show up using Capture One, which reads and interprets correctly the proprietary tags embedded within the .IIQ files.
Right now both Photoshop CS6 and Lightroom 4 officially support the whole range of Phase One backs yet the problem is there anyway. There’s an easy way to check whether your raw files are correctly managed by ACR, or they show a so-called paneling “bug”. It’s worth to try this one at least once on some of your files (a white wall test shot and a couple of real world pictures):
- Open the .IIQ file in Adobe Camera Raw, everything zeroed but the White Balance. Bit depth and RGB profile do not matter, your default values are fine.
- In Photoshop, convert the file to the Lab colorspace (Image – Mode – Lab Color). You know Lab, don’t you?
- In the Channels palette, make the “a” channel only active (Command + 4 on the Mac, CTRL + 4 for PCs, Photoshop CS5 to CS6)
- Image – Adjustments – Equalize.
- Make the “b” channel active (Command + 5 on the Mac, CTRL + 5 for PCs) and repeat the step #4.
If either the “a” and/or the “b” channels show some evident grid, your files are unofficially unsupported in ACR! Sometimes the grid is not so obvious, yet you may find some oddities like the one below, which are bad times anyway.

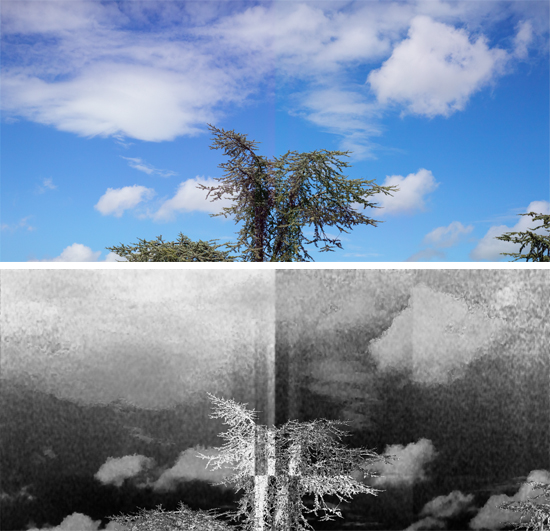
Phase One IQ180. Up: sky shot with noticeable color paneling (magenta cast in the left side). Bottom: the “a” channel from Lab equalized shows a weird paneling pattern
As a side note, I know that the above mentioned moves are an extreme way to brutalize an image for testing purposes – yet Lab channel stretching is fairly used among retouchers, and the Equalize command is actually employed in the so-called Modern Man from Mars technique by Dan Margulis, a fundamental step in his Picture Postcard Workflow, aka PPW).
I’ve been personally reported by a Phase One user that the same paneling may appear even using Capture One as the one and only raw developer. That is, your own digital back’s internal calibration data doesn’t correspond to the actual sensor’s response no more, which sadly means: send it to Denmark for revision. (That is what he did and luckily the problem has been solved flawlessly)
Do open .IIQ files with Adobe Camera Raw anyway
I sincerely do not like Capture One Pro (also known as C1 Pro). It isn’t a polite thing to write in some forums (people seem to polarize when it comes to religion, food and raw processors), but nobody hears me now so I can tell you: it’s a bad piece of software, clumsy, so slow, involved, unnecessarily complex, UI and controls are badly designed (try to move a point on a channel’s curve while keeping self control), even from the sheer algorithms point of view ACR 7.0 surpasses it without any doubt. That’s my own, personal point of view of course – and I’m not a big Adobe’s fan, usually.
Mind you: C1 image quality is quite good (yet I still prefer ACR most of the times) but it comes with a price – way too high: in terms of usability, mainly. If I had no alternatives, I would patience and adapt to C1 cumbersome structure. But ACR 7.0 delivers a competitive, impressive image quality: noise reduction is superior, general usability is orders of magnitude superior, Local Laplacian filtering (the revised algorithm behind Clarity) is so nice, now that Adobe has implemented R, G, B single channel curves (it’s been a long wait: hurray!) there’s no reason not to use it.
So I do open .IIQ files with ACR (because I’m a retoucher, photographers are used to work with Lightroom: that, technically speaking, is the same engine within a different car). How?
Avoid DNG conversions
 Do not try to export the .IIQ as DNG in CaptureOne (a task performed at unusual speed compared to C1 standards, I shall say). It’s been reported that earlier version of C1 messed with some metadata and filesize (inflated as much as the IIQ file’s double) – whether it’s been fixed or not (not so, at least for the filesize), even using an updated Capture One version those DNG are still not calibrated, so when you open them in ACR the very same paneling bug shows! This is a serious problem, that from my personal standpoint should be taken into account by Phase One: when users convert to a standard format like DNG, they should be given correct data. I can understand that some proprietary pieces of information may not fit into the DNG specs (the actual spots used by the camera to focus the image for instance, something you could get from Canon DPP as far as I remember), but here we talk about image channels that are intentionally left uncorrected!
Just in case you’re wondering, Adobe DNG converter couldn’t care less about Phase One sensor calibration data. The only workaround I came up with, well… it isn’t exciting, but it works, provided that you’re ready to lose a little something.
Using Layers and Blending Modes
I’ve had the opportunity to work extensively with two P65+ and one IQ180 Phase One digital back units (60 and 80 megapixels respectively) in the last three years, so these models are what I have a direct experience of; the following should apply to every P1 back that shows the paneling “bug” (please notice that I use quotes for I know it’s not officially a bug – yet the fact that a C1 exported DNG file shows paneling makes me call it bug anyway; surrounding the “bug” word with quotes sounds like a fair compromise to me).
Since the paneling affects “a” and “b” channels of Lab (more the former, green-magenta, and a bit less the latter, blue-yellow axis, i.e. the chromatic component of the image) and not the L, I came up with a decent workaround processing the raw twice and blend the results as a Luminosity and Color layers – as follows:
- Open the .IIQ file in ACR 7.0 (or any ACR version you legally own).
- Tweak all the parameters to your taste – don’t spend too much time on chromatic noise reduction (it will be lost) – and open it in Photoshop as a Smart Object (shift-click on the Open Image button).
- Open the very same .IIQ file in Capture One.
- In Capture One, mimic the curves, white balance and everything else you did in ACR except for luminosity noise reduction and sharpening, cross the fingers and save a TIFF (same bit depth and output ICC profile you used in ACR).
- Open the TIFF in Photoshop, drag & drop on it the Smart Object coming from ACR and set its blending mode as Luminosity. If you keep the Shift key pressed while doing the drag & drop, the imported layer will automatically align.
- [Optional] Select the two layers and convert them to a single Smart Object (good idea if you need to correct the perspective)
 So you end up with a two layers document: a background layer which is the Capture One interpretation of your file, and a upper layer which is the ACR version in Luminosity. That is: you use the color from Capture One (input ICC profile, curves, chromatic aberration correction and chromatic noise reduction, etc. etc) and the luminosity from Adobe Camera Raw (with its own noise reduction, Clarity, powerful shadows and highlights recovery, etc).
Please note that you can invert the layer’s order (the ACR below and the CaptureOne above, but in Color blending mode!), it gives the same net result.
If you are a color management geek, you may be either happy to choose from Capture One input ICC profiles; or unhappy because it’s harder to use your ColorChecker Passport as a profiling tool in C1. In both situations, don’t bother too much. I haven’t found either profiles as particularly accurate – and like Dan Margulis once said: if there’s a problem in a picture, just correct it and the problem disappears.
Conclusions
Adobe Camera Raw 7.0 is an impressive leap forward compared to 6.x version. Its usability is far, far higher compared to Capture One Pro, it delivers first class image quality and cutting edges algorithms. Yet many Phase One digital backs are unofficially unsupported because the sensor calibration data embedded in .IIQ files is not correctly interpreted by ACR; nor the DNGs exported from Capture One undergo any kind of normalization (bug!). As a result, to open a Phase One raw file in Adobe Camera Raw means ending up with an image that contains a geometric, chessboard pattern of opposite color casts, mainly in the green-magenta axis: an almost unnoticeable pattern (sometimes but not always), that may become more apparent easily if the retouch involves some color boosting steps.
As a workaround (waiting for Capture One to correct DNG exporting, and/or Adobe to fully support Phase One raw files) I suggest to process the raw twice (one with C1, one with ACR) and merge the two files in Photoshop as Color and Luminosity layers. It isn’t a particularly elegant solution, but I’ve found no alternatives and it works – possibly… it takes the best of two worlds. Possibly. 😉


